
 Ann received the Elisa Contemporary Art Award in the 17th annual “The Healing Power of ART” exhibition, presented by Manhattan Arts International. More than 800 works of art were submitted from artists in 11 countries, and 60 of those artworks were chosen for inclusion in the exhibition.
Ann’s artwork was selected for the award by Lisa Cooper, owner of Elisa Contemporary Art in NYC, who served as one of the four Special Award Jurors for the show. According to Lisa Cooper she chose Ann because her paintings take the viewer into a tranquil meditative space. Cooper explained, “There is a calming quality in the landscapes she creates. And an optimism within the floating clouds. The paintings invite the viewer into a space to rest, look, explore and wander. There is a serenity in the muted colors and lush abstracted landscapes. They are inviting, and not completely defined.”
And a special note: “Thank you!” for the recognition given to Ann’s artwork by Art Design Carta, the international marketplace for design professionals such as home decor companies and interior designers. Her paintings have been featured in their highlights, in the landscape collections category.
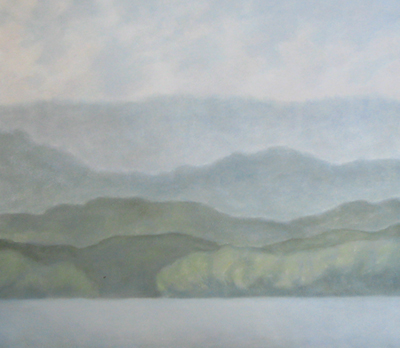 Initial steps in creating artwork: This is the first layer of a new painting. I begin by creating the basic areas and shapes, and then let that layer thoroughly dry. For this particular painting, I’m using colors for the initial layer that are a bit lighter and more subdued than the final artwork will be. (The mood of the piece will be softly atmospheric, and I’ll wait before deciding to add stronger shades in future layers.)
Although I draw with a general plan or idea, it’s not an inflexible one- if I begin a painting and it seems that the landscape naturally moves in a different direction, I’ll happily adapt to what I’m seeing evolve on the canvas.
I’ve decided on my basic color palette at this point (soft blues and greens) and have established where the lightest and darkest values in the painting will appear, although that too may vary somewhat as the painting progresses. When this initial layer dries I’ll begin a second layer to further define these shapes. I paint in thin layers (often up to five) with ample drying time between painting sessions. (For more on this process, please see the Tips and Techniques information below.)
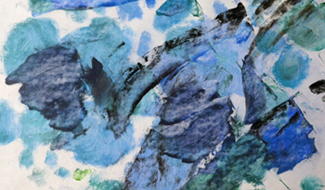
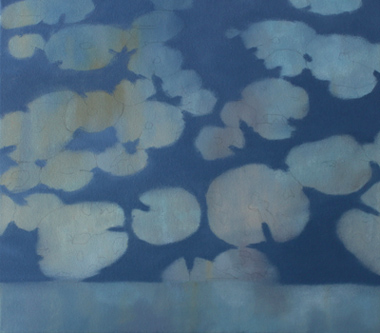 A recent “work in progress” image of a botanical painting: Sometimes I find that really interesting patterns emerge while art is mid-completion. I stopped at this stage of the painting to take a photo, since the juxtaposition of the blue background against the multi-toned outline of lily pads is visually compelling in and of itself.
I’ve been painting a few contemporary botanicals and abstracts that will contain various design elements; this is an early stage of a multi-layered piece that will incorporate collage elements.
Process: Over a thin wash of oil paint that has fully dried, I sketched the lily pad shapes in graphite, then added a layer of opaque color to further define those shapes. Artistically, I’m fascinated by the patterns created by the objects themselves, and by the spaces between objects.
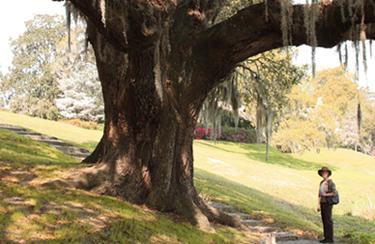 At Middleton Place: Artists and photographers alike appreciate the wide array of flowers and trees at this historic site along the Ashley River in Charleston, South Carolina. When not there volunteering as a museum docent, I’d often visit (sketchbook or camera in hand) to see the camellias and azaleas, or the blue iris, which blossoms near Cypress Lake.
If you haven’t been to Middleton Place, I recommend a trip to see this beautiful estate of one of the signers of the Declaration of Independence. Middleton has the oldest formal landscaped gardens in the country, with a rich and varied botanical history, including the presentation of some of America’s first camellia plantings to Gov. Henry Middleton by the French botanist Andre Michaux. The museum houses an impressive international art collection that spans centuries. (At right- standing near one of Middleton’s live oaks on a great day for sketching.)
Posting a few tips and techniques re: questions received about painting from aspiring artists:
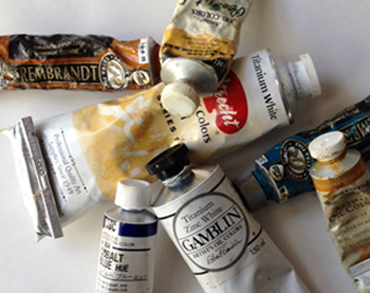
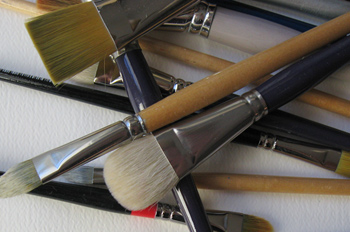 Paints and brushes: I use a variety of professional-grade paints, including Rembrandt, Grumbacher, Gamblin, Windsor & Newton and several of the Holbein oil paint shades, along with a wide range of brushes, from bristle brushes to sables, many of them “filbert” or “bright” shaped. I generally choose opaque paint colors for painting the initial layers, and add in transparent and semi-transparent shades for washes, dry brush effects, and final layers.
The specific paints you choose will need to perform well both during the painting process and have durability for many years to come, so paint quality definitely matters. When choosing paint, I also look for the AP (Approved Product) designation from the ACMI (the Art & Creative Materials Institute), since safety when working with artist’s materials is an important consideration.
 Color theory: Whether you practice on your own, rely on color theory books, or train with a professional artist or teacher, you’ll undoubtedly encounter a wide variety of advice about the best way to approach color in your artwork. Color preferences are subjective, and many artists develop their own methods for achieving a desired look. Each paint has somewhat different drying times, working properties and color temperatures, and by experimenting with a variety of paints you’ll find the paints that will let you blend and apply color for the optimum specifications needed in your artwork.
Most painters begin by mastering the basics, such as blending primary and secondary colors, creating shadows and highlights, understanding color arrangements, and the use of cool and warm tones. In the process you’ll become familiar with complementary color schemes, ways of arranging color to impact mood, understanding value (where a color is located on a range from light to dark,) and working with monochromatic and analogous color schemes. Using a Quiller Wheel was helpful to me during the learning process- it’s a visual reference guide for interpreting color relationships, and mixing a range of colors. A good reference book for creating colors (with over 600 shades illustrated) is The Oil Painter’s Pocket Palette by Rosalind Cuthbert.
 Creating specific shades: Although I know artists who sometimes use a paint color right out of the tube with great results, each shade I use is a mixture created by combining several “standard” colors.
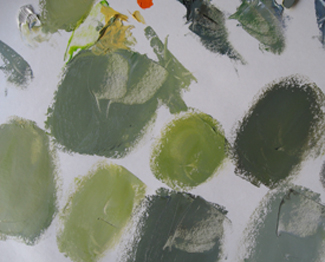
I begin by creating larger pools of the colors that will be contained in a work of art, then mix variations of those tones as needed. (This is a range of greens I mixed for a treeline.)
Subtleties and gradations of color are really important in my work, so considerable “prep time” goes into color arrangements and decisions before I begin painting. Your own painting style and approach to color will influence the color planning aspects of your artwork.
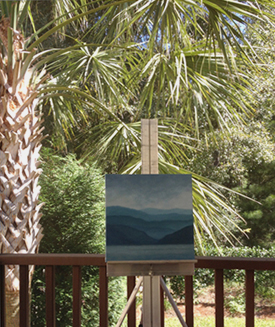 Lighting and workspace: Natural lighting is a vital part of my color-mixing and painting process. Whether I’m working in a studio with abundant natural lighting, or am outdoors (where my preference is placing the easel in a shady spot on a sunny day) I utilize the same kind of lighting for the multiple layers that comprise each painting. The way your painting appears, as well as your color mixing process, can be noticeably different with natural sunlight versus indoor lighting. Therefore, I recommend that you select the lighting option that works best for you, then complete each painting under those consistent conditions. Since I prefer natural lighting, I use 3 easels of various sizes that can be easily moved, and are also suitable for outdoor work. (This is a photo of my small tabletop easel on an afternoon when I was painting on my back porch.)
Special considerations for landscapes: Landscape artists know that distance affects colors, just as atmospheric conditions do, time of day, and season. When one variable shifts, it can impact the related color (and definition) of the land, water, and sky in a scene. Distance is one of the primary variables you’ll encounter in landscape painting.
Color perspective refers to the changes caused by distance and atmospheric details, where colors are generally stronger in the foreground, with a gradual diminishing of values toward the background. Learning how specific shades (warm and cool) and objects (ex: hills) change with distance, and how you’ll interpret those relationships in your work, is a matter of study, experimentation and practice.Some of the most helpful materials I used in the landscape learning process were books by John Carlson, Edgar Payne and Kevin Macpherson.
 The palette mixing process: I frequently work in somewhat monochromatic tones, because I love the look of tonalism to reflect mood and time of day, along with the softer, meditative qualities I’m seeking through that type of painting. (This is one of my work palettes, just having mixed various shades of blue for an ocean painting). No matter what I’m painting, I tend to do a lot of mixing of very specific shades, which requires fresh palette surfaces throughout the painting process. I’ve been using the Blick Studio palette sheets for a few years, and they work really well for me. To mix colors and move them around the palette surface, I use lightweight, flat-handled palette knives.
Creating shape and dimension when you start a painting: Shape and form define the objects in your artwork, and with organic forms such as trees and clouds, you’re creating irregular shapes as they appear in nature- essentially free-form and asymmetrical. When I begin drawing those on the canvas for a landscape painting, I do it with paint rather than pencil, and I often mix just three pools of color- highlight or the lightest value, (where sunlight will appear on trees, for example), then a mid-tone value, and a shadow tone.
 Using opaque paint, I loosely place paint where I want the highlights, middle values, and shadows to appear, then I blend the edges, and let the paint dry for several days. (Depending on the composition, at this early stage I’m not adding colors to indicate distance and atmosphere yet, I’m just determining where the main shapes will be.)
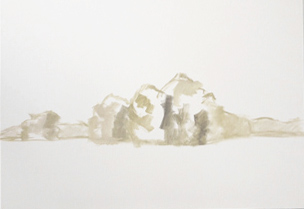
This photo is an example of an initial layer for a tree line. With subsequent layers the distant trees will appear to recede as I continue working, with the use of different color values and softer lines. In my initial drawing I’m simply placing trees, clouds and other objects on the canvas, to decide on a composition that works well.
I begin a painting with a general idea of the subject matter, but remain open to changing it if I find that when I’m drawing shapes, I’d like to emphasize a different aspect of a scene. For me, that’s a wonderful characteristic of painting- moving in the direction of what is unfolding on the canvas.
 With the treeline blended, you can see how much shape and dimension is possible through the use of just a few shades. But this is only the beginning of a layering process- several more layers of opaque as well as semi-transparent shades can be added to give depth and visual interest to the work. Choosing those shades and types or qualities of paint will be dependent on the other elements in the composition, such as the sky and the season, because everything on your canvas works in relationship and harmony, so the overall appearance can reflect what you’re hoping to achieve.
There’s more than a fair amount of experimentation for every artist in finding a style and a painting process that works best for them, but without question, it’s a joyful endeavor. Painting is a lifelong journey, and once you’ve mastered one element in the process, no doubt you’ll be ready to add to your skill set by learning something new. (The ongoing challenge of learning is one of the aspects of art I appreciate most.)
Thanks for asking about my painting process- I hope this information is helpful! All the best, Ann